Tuesday, July 3, 2012

The move is finished...

Well my move is finally finished...now it's time to start unpacking!  YUCK!  I have boxes everywhere.  It's driving the gf and myself crazy!  I don't even have room in the kitchen to bake. And to top it off, I can't find my favorite recipe book with all my mom's recipes in it.  :(

Here is a recipe book I recommend for those of you with food allergies!  The author is Cybele Pascal.

cybele

One of my favorite recipes is the Blueberry Boy Bait:


Allergen Free Baking!
Blueberry Boy Bait


blueberry boy bait
Blueberry Boy Bait
makes 8 servings (gluten, wheat, dairy, egg, soy,  peanut, tree nut,  and sesame free)
This moist, buttery coffee cake with its crisp, cinnamon-sugar topping is based on an old-fashioned recipe from the 1950s, called Blueberry Boy Bait, a coffee cake named for the effect  it had on teenage boys. My boys aren’t teens yet, but this bait works for them. They’ll gobble it up in one day—with not a crumb left over.
2 cups Basic Gluten-Free Flour Mix, or Authentic Foods GF Classical Blend, or King Arthur gluten-free multi purpose flour
1/2 teaspoon xanthan gum
1 tablespoon double-acting baking powder
1 teaspoon salt
3/4 cup dairy-free, soy-free vegetable shortening
3/4 cup firmly packed light brown sugar
1/2 cup granulated sugar
41/2 teaspoons Ener-G egg replacer mixed with
6 tablespoons rice milk
3/4 cup rice milk
1 cup fresh or frozen blueberries tossed with
1 tablespoon Basic Gluten-Free Flour Mix
1/4 cup granulated sugar mixed with
1/2 teaspoon ground cinnamon
1. Preheat the oven to 350°F. Grease a 9 by 9-inch baking pan and sprinkle with a little
gluten-free flour mix, tapping out any extra.
2. Whisk together the flour mix, xanthan gum, baking powder, and salt. Set aside.
3. In the bowl of a stand mixer fitted with the paddle attachment, combine the shortening, brown sugar, and granulated sugar. Mix on medium-high speed for 2 minutes, or until fluffy.
4. Add the egg replacer and mix for about 20 seconds.
5. Reduce the speed to medium and beat in one-third of the flour, mixing for 15 seconds.
6. Add half of the rice milk, mixing for 20 seconds.
7. Beat in half of the remaining flour, then the remaining rice milk, and finally the remaining flour mixture, scraping down the sides of the bowl as necessary.
8. Add half of the batter to the pan, using a frosting spatula to spread the batter evenly
across the bottom of the pan. Sprinkle with half of the blueberries. Top with the remain-
ing batter, spreading it as evenly as possible across the blueberries. Top with the remaining blueberries, then sprinkle with the cinnamon-sugar mixture.
9. Bake in the center of the oven for 1 hour, until the cinnamon-sugar mixture has begun to caramelize and the top is golden. Let cool in the pan for 30 minutes before turning out
onto a serving platter (or just cut into pieces and serve out of the pan). Serve warm or at
room temperature. This cake is even better on day two!
Tip:  If using frozen blueberries, keep frozen until the last minute, or they’ll turn your
batter blue-green

Wednesday, June 20, 2012

Gluten-Free Banana Bread Waffles


Gluten-Free Banana Bread Waffles
Prep Time: 5 minutes
Total Time: 25 minutes
Serving Size: 6
Gluten-Free Banana Bread Waffles
Ingredients
1 cup brown rice flour
3/4 cup tapioca flour
2 tablespoons raw cane sugar
2 teaspoons baking powder
1/2 teaspoon xanthan gum
1 1/2 teaspoons ground cinnamon
1/4 teaspoon ground nutmeg
1/2 teaspoon salt
2 very ripe medium bananas, mashed
1/4 cup canola oil, plus more for brushing the waffle iron
1 teaspoon vanilla extract
1 1/4 cups unsweetened almond or rice milk
1/3 cup walnuts, chopped (optional)
Maple syrup
Extra sliced bananas (optional)
Instructions
  1. Preheat your waffle iron according to the manufacturer’s directions. Preheat your oven to 200°F, and set out a rimmed baking sheet.
  2. In a large bowl, combine the brown rice flour, tapioca flour, sugar, baking powder, xanthan gum, cinnamon, nutmeg, and salt. Set aside.
  3. In a medium bowl, combine the bananas, canola oil, vanilla, and milk. Add to the dry ingredients and mix until just combined. Fold in the walnuts if using.
  4. Use a pastry brush or paper towel to thoroughly oil the top and bottom plates of your waffle iron. Ladle 1/2 cup of batter onto the iron, and cook according to the manufacturer’s directions. Place the waffle on the baking sheet and keep warm in the oven while you make the remaining waffles. Serve warm with maple syrup and extra sliced bananas, if desired.
  5. Stack leftover cooled waffles with a sheet of parchment paper in between each one, then place in an airtight container and freeze for up to 1 month.

GF Flour Tortillas


Gluten-Free Flour TortillasMakes four 8-inch tortillas
These whole grain Gluten-Free Flour Tortillas are nutritious, versatile, low fat, and fun to make. Many of my readers were looking for an alternative to brown rice tortillas, which tend to crack and split. Well, here you are: These are made with millet and sweet sorghum instead!
Back
1 of 8
1 Put dough on board; roll into a ball
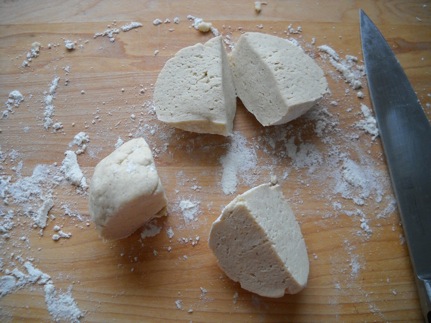
2 Cut into four pieces
3 Roll into four balls
4 Press into a circle
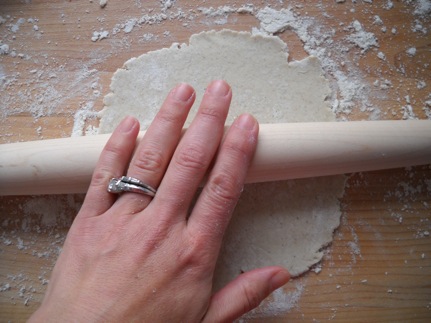
5 Roll out into a 9-inch circle
6 Trim from around the bowl
7 Lift tortilla with spatula
8 Finished tortillas
Ingredients
  • 1 cup Gluten-Free Bread Flour Mix (recipe follows)
  • 1 tsp xanthan gum*
  • ¾ tsp double-acting baking powder**
  • ½ tsp fine sea salt or table salt
  • ¼ cup plus 2 Tbsp rice milk
  • 2 tsp canola oil
Directions
  1. Measure out flour mix by spooning flour into a dry measuring cup, then leveling it off with a straightedge, or the back of a knife. (Do not scoop the flour directly with the measuring cup or you’ll wind up with too much flour for the recipe). Combine flour mix with xanthan gum, baking powder, and salt, whisking well.
  2. Heat rice milk until warm (not hot). Make a well in the center of your dry ingredients, pour in rice milk and canola oil, and mix with a wooden spoon until combined. The dough will be sticky.
  3. Turn out dough onto a board or work surface, lightly floured with some Gluten-Free Bread Flour Mix. Sprinkle a little more flour mix onto dough and onto your hands.
  4. Knead the dough about 30 seconds, until smooth and no longer sticky, then mold into a ball. Place ball into bowl, and cover bowl with a damp kitchen towel. Let rest 20 minutes. Remove dough from bowl, and cut into four pieces. Roll into four balls.
  5. Transfer balls to a dry plate, cover with damp towel and let rest another 10 minutes. Working with one ball at a time, sprinkle a little more flour mix on the work surface. Using the palm of your hand, press ball into a disk about 4-inches in diameter.
  6. Sprinkle a little more flour mix on dough; flip and roll out into about a 9-inch circle with a floured rolling pin. I usually like the heavy old-fashioned rolling pins, but for this recipe I prefer the lighter French dowels.
  7. Using an offset spatula, loosen dough from board all the way around, flip, and give it one more roll over. Don’t worry that it’s not a perfect circle. We’re about to fix that. Place an 8-inch bowl over the tortilla, and trim the edges.
  8. Remove bowl, and use the offset spatula to separate the tortilla from the board.
  9. Transfer tortilla to a plate and cover with the damp towel while you roll out the rest. Repeat steps to roll out the remaining three, remembering to add more flour mix to your work surface and rolling pin.
  10. Heat a 10-inch cast-iron skillet over high heat until it starts to smoke. You want that puppy really hot.
  11. Add a tortilla, cook 30 seconds, flip with a spatula and cook 30 seconds more until there are a few brown spots on surface. Do not overcook, or the tortillas will become brittle. Transfer to a plate, and keep covered with a dry cloth while you finish cooking the rest. Eat warm or at room temperature. To store any that don’t get eaten right away, wait until cool, then seal in a zip lock freezer bag and place in freezer.
*You may use guar gum in place of xanthan gum if you are concerned about corn derivatives.
**Hain Featheweight Baking Powder is corn free, and can be used in place of double-acting baking powder.
Gluten-Free Bread Flour MixMakes 6 cups

Ingredients
  • 1 1/2 cups millet flour
  • 1 1/2 cups sorghum flour
  • 2 cups tapioca starch
  • 1 cup potato starch
Directions

1. Measure out flour by spooning flour into a dry measuring cup, then leveling it off with a straightedge, or the back of a knife. (Do not scoop the flour directly with the measuring cup or you’ll wind up with too much flour). Combine all ingredients in a gallon-size Ziploc bag. Shake until well blended. Store in refrigerator until ready to use.
“Gluten-Free Bread Flour Mix” recipe reprinted with permission from The Allergen-Free Baker’s Handbook: How to Bake Without Gluten, Wheat, Dairy, Eggs, Soy, Peanuts, Tree Nuts, and Sesame. Copyright © 2009 by Cybele Pascal, Celestial Arts, an imprint of the Crown Publishing Group, Berkeley, CA.
“Gluten-Free Flour Tortillas” Copyright © 2010 by Cybele Pascal

Cupcake of the Month!


This is what I want to make first! 

Allergy Free Devil's Food Cupcakes
CUPCAKE OF THE MONTH IS HERE!


Allergy Free Devil's Food Cupcakes
by More from Magnolia
Converted by Marcie Dingerson

2 teaspoons vanilla extract
1 1/2 cups Buttermilk (coconut milk with vinegar set aside for about 5 minutes)
1 cup pumpkin
1/2 cup organic sugar
1/2 cup brown sugar
1/2 cup coconut oil melted

Mix

Add in

2 Cups GF all purpose flour (I used Bob's Red Mill)
1 Cup cocoa
1 1/2 teaspoons baking soda
1 teaspoon baking powder
1/2 teaspoon salt

Mix and pour into cupcake pans. I used mini bunt pans. Bake at 350 for 25 minutes. Cover with chocolate or icing of your choosing and enjoy!

Can't wait to get back to baking!

Good Morning...

Its has been a rough few weeks.  Trying to get settled in the new place and get the old place cleaned up and painted...it's hard work!!

I can't wait to get things in order so that I can start cooking and baking!  For me it is such a stress reliever. 

Monday, June 4, 2012


Here is a recipe for whipped cream made from coconut milk!  I thought I would share...ENJOY! :) 


We love our whipped cream in coffee, on berries for dessert, really on any of our primal desserts.  But it’s nice to have an alternative to dairy and for our Paleo friends.
Henry thought it would be good to have some cold coconut milk and stuck a can into the fridge for a couple of hours. When he opened it he noticed that it had gotten very thick on top, so he scooped it out and noticed that it had separated from the coconut water. So he added a little cinnamon and a little organic vanilla extract to the thick coconut and whipped it up. To our happy surprise it got thick and creamy immediately, and Oh Wow!!! sooooo good.
So since then we’ve been enjoying our morning cup of coffee with a spoon full.
So here are a couple of pictures for you – try it, it is so incredibly easy and completely gluten and dairy-free.
Step 1: Take a “full fat” can of Organic Coconut Milk and place it in the fridge for some time or best over night
Refrigerated Coconut Milk being scooped out by Henry
Step 2: Make sure that you scoop out all the thickened coconut cream, and that the water is left over. Don’t discard the water, use it to drink or in a shake.
Coconut Water
Step 3: After scooping it out, add a little cinnamon and vanilla, and whip it in a mixing bowl until it begins to thicken.
Step 4: Enjoy every bite, anyway you like! :-)